
Overview and usage of Virtual Desktop
1. Introduction
- “Azure" is a cloud computing platform run by Microsoft. This page describes the virtual Windows environment using "Virtual Machines" within it.
- “Virtual Machines" provides the same Windows environment for all users by aligning settings.This is suitable for lectures that require matching the Windows versions and settings. Also, since it is Windows on virtual, you can try running programs, settings that might affect the OS.
- Virtual Windows is not prepared before use. Users create their own virtual Windows in "Azure Portal". Virtual machines consume usage fees, called "credits", depending on the date of creation and running time. Kyushu University students can use up to $100 in total for the entire "Azure" service in a year. However, users must be aware of the amount of "credits" remaining and stop the service when it is not used, as the service becomes unavailable when the remaining "credits" reaches zero.
- In addition, storage and network charges are incurred even when virtual machines are stopped. If you don't want to consume "credits", it is necessary to delete virtual machines with resource group. When the virtual machine is deleted, the files downloaded in the virtual machine will be lost. Please save files that you do not want to lost to Microsoft 365 OneDrive for Business.
- Multiple virtual machines can be created per person, but "credits" will be consumed for the number of machines running.
- There are several types of virtual machine specifications to choose from, but basically, the higher the performance, the more "credits" it consumes. You can choose between Windows 10 and Windows 11.
- For more information on “Virtual Machines”, please visit the “Microsoft Azure” website.
- Contents
2. Log in to Azure Portal
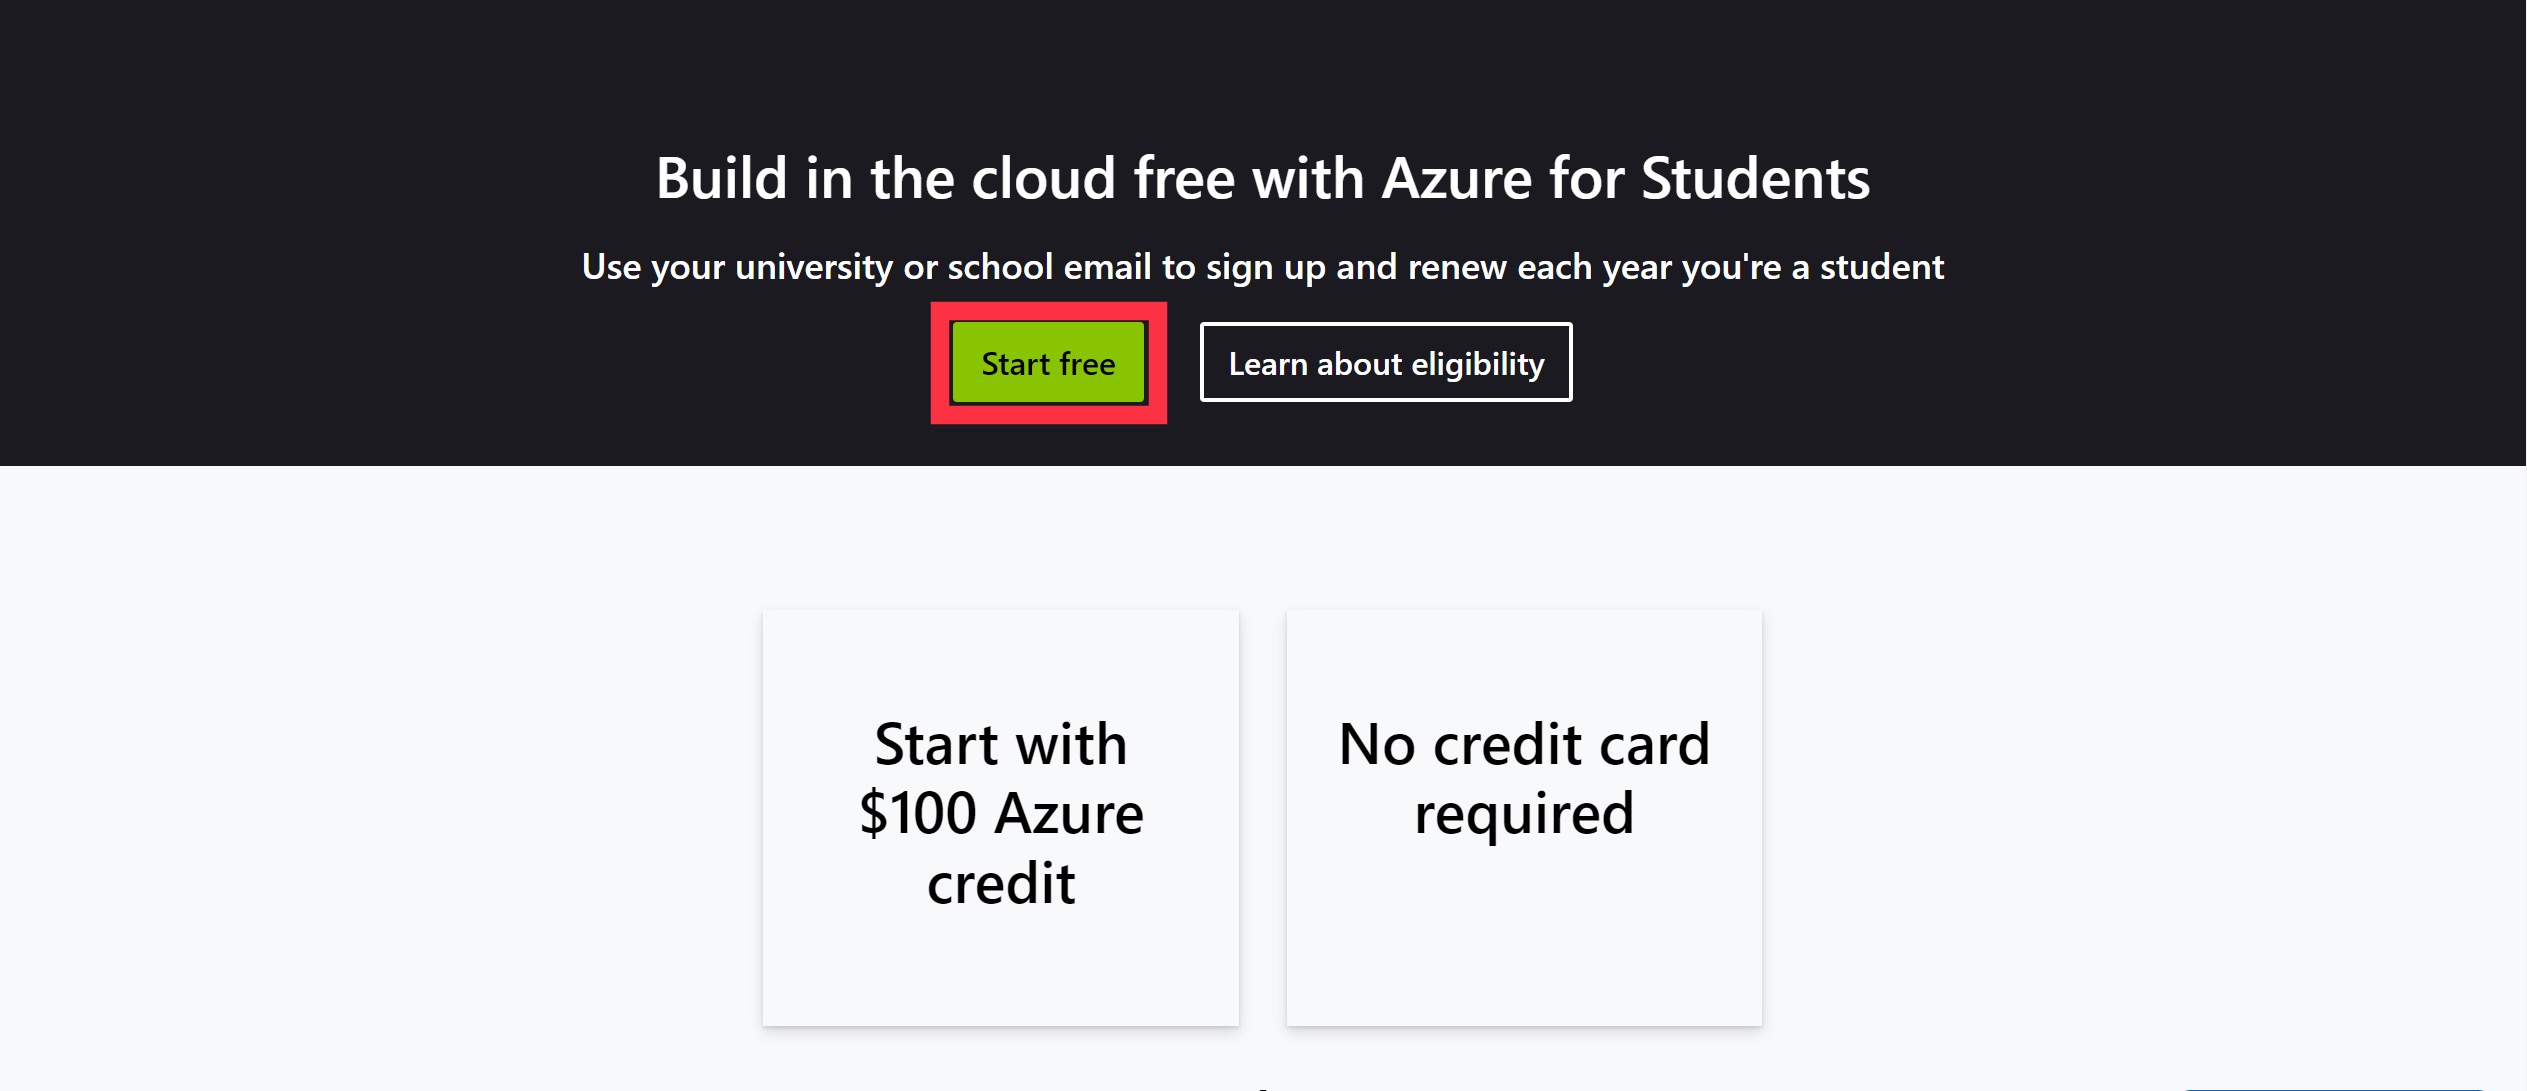
- Click here to Start free
- Sign in from the Azure for Students page, not the regular Azure page.
- Fill in Your profile.
- After completed, you will be redirected to Azure Portal.
| (1) |
|
 |
| (2) | When you are transferred to the login page of Kyushu University, sign in with your SSO-KID and password. |  |
| If you do not, select Sign in to the organization from the sign-in options, and enter the Kyushu University domain in the search field for the organization. | 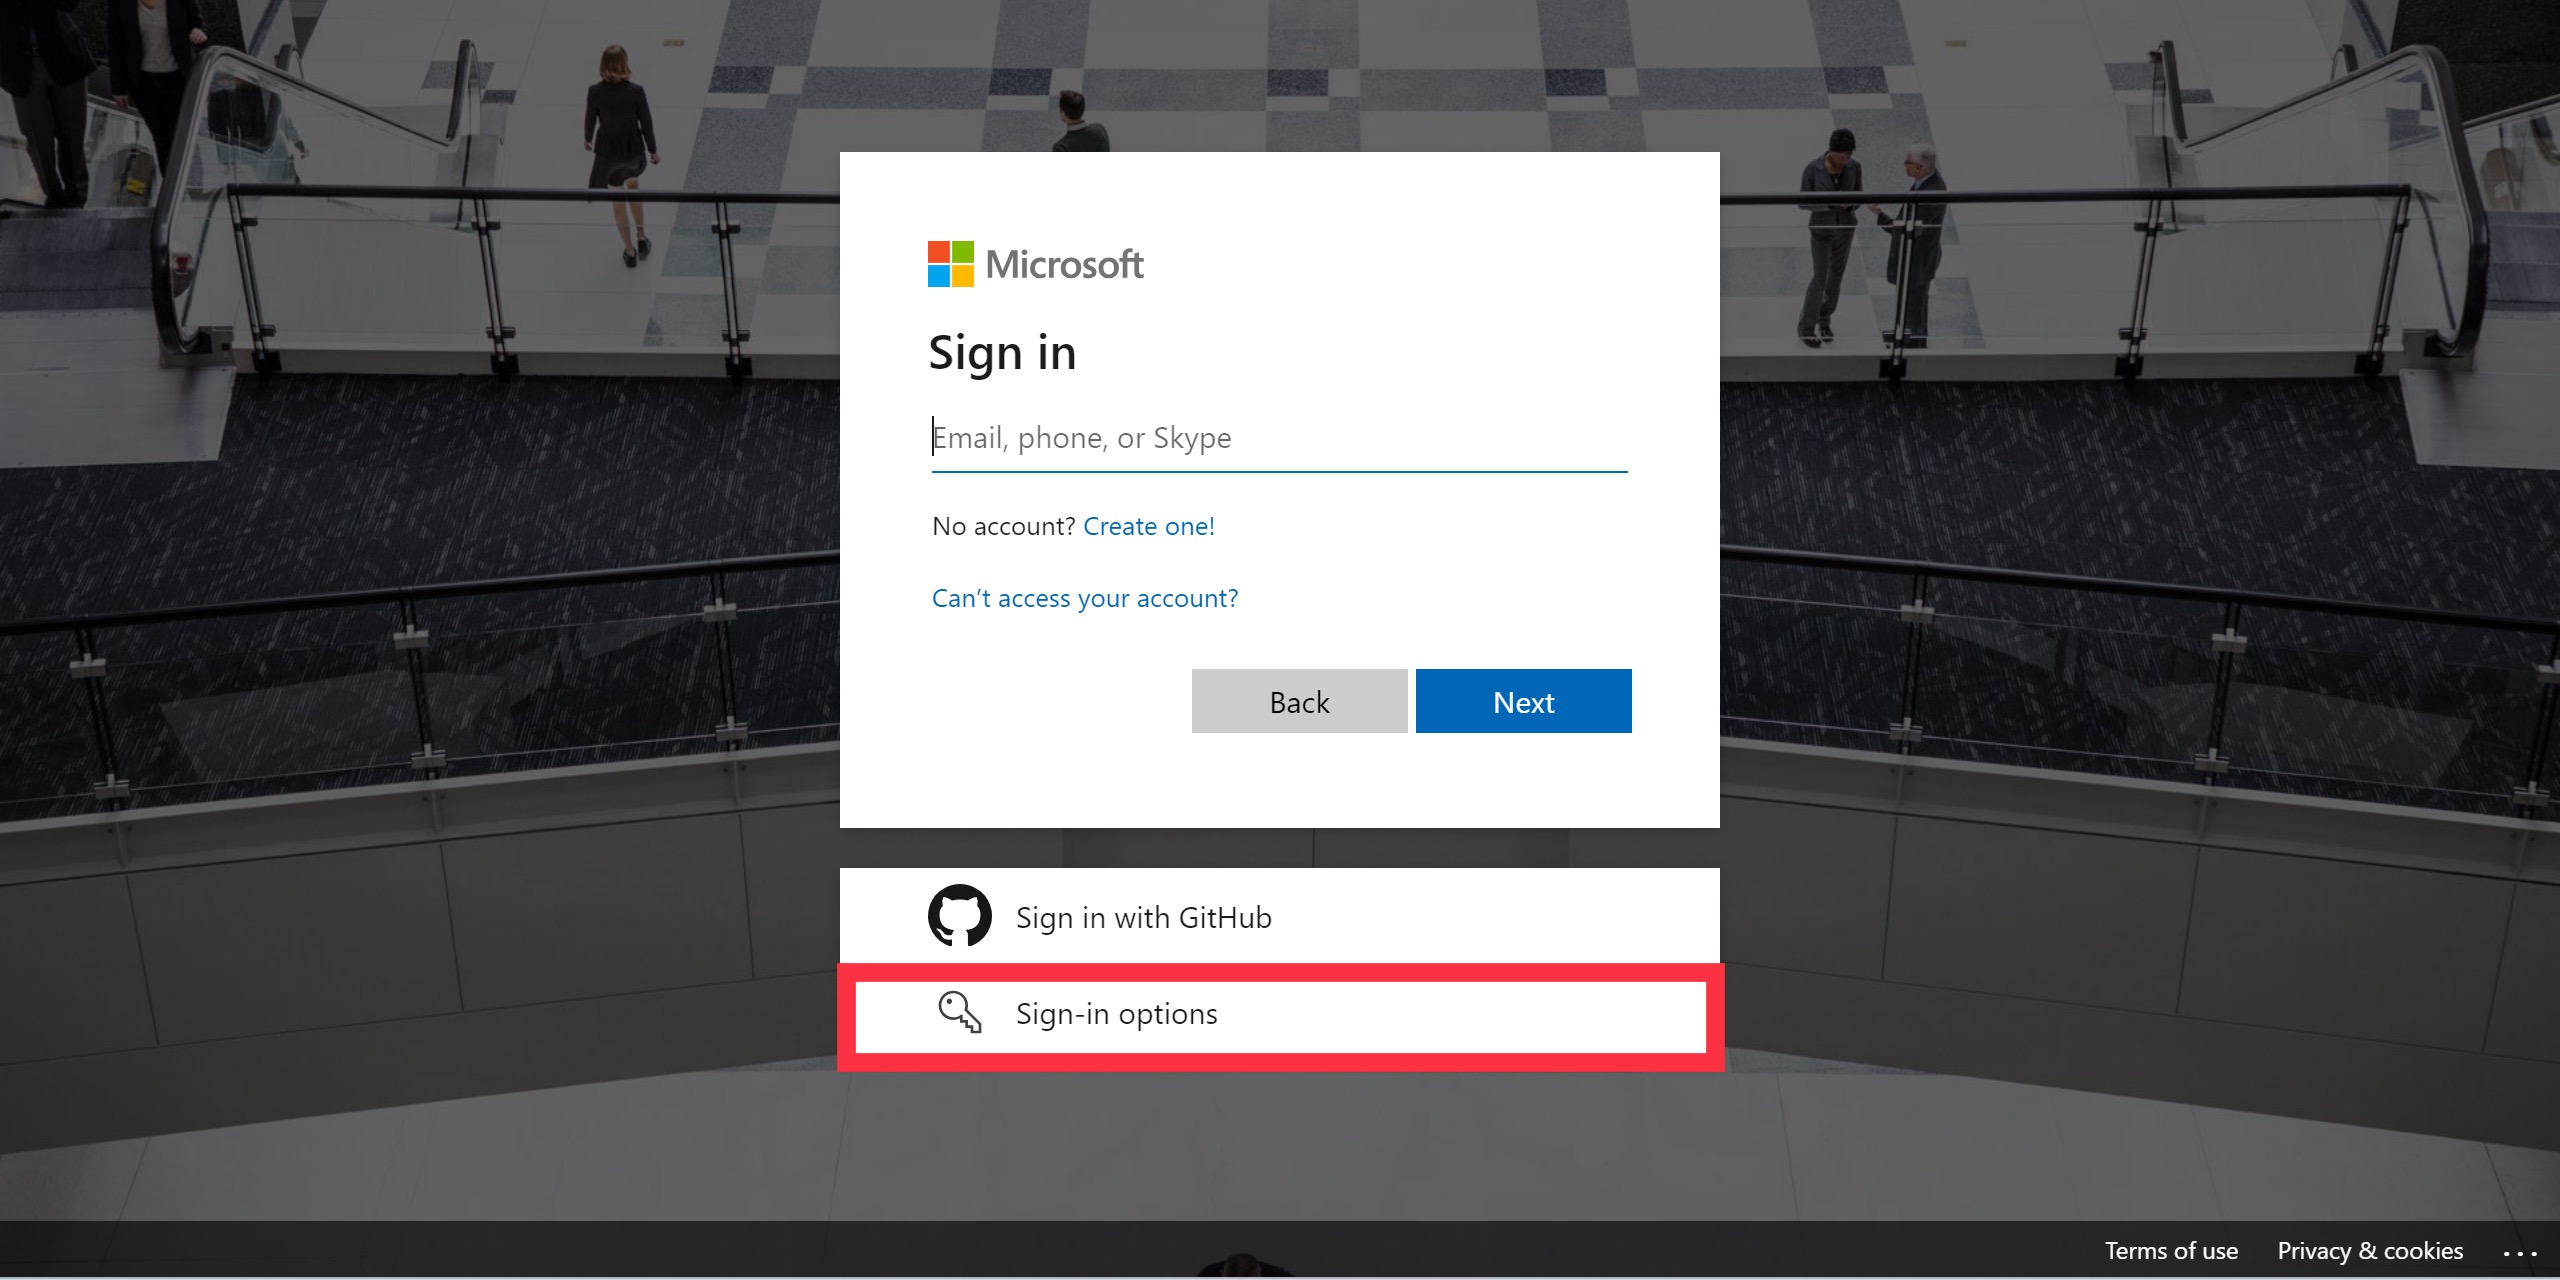 |
|
 |
||
| (3) | Fill in Student Verification. |  |
| (4) |
|
 |
3. Creating a virtual machine
- Configure the virtual machine.
- Set the Region to "Japan East" and the Security Type to "Standard".
- Set "Windows 11 Pro" as the image. If you cannot find "Windows 11 Pro", click on "View All Images", search for "Windows 11", and select it from the search results.
| (1) | the search bar at the top of the screen, search for "Virtual Machines" and click on "Virtual Machines”. |  |
| (2) | Click on “Create” at the top of the screen. | 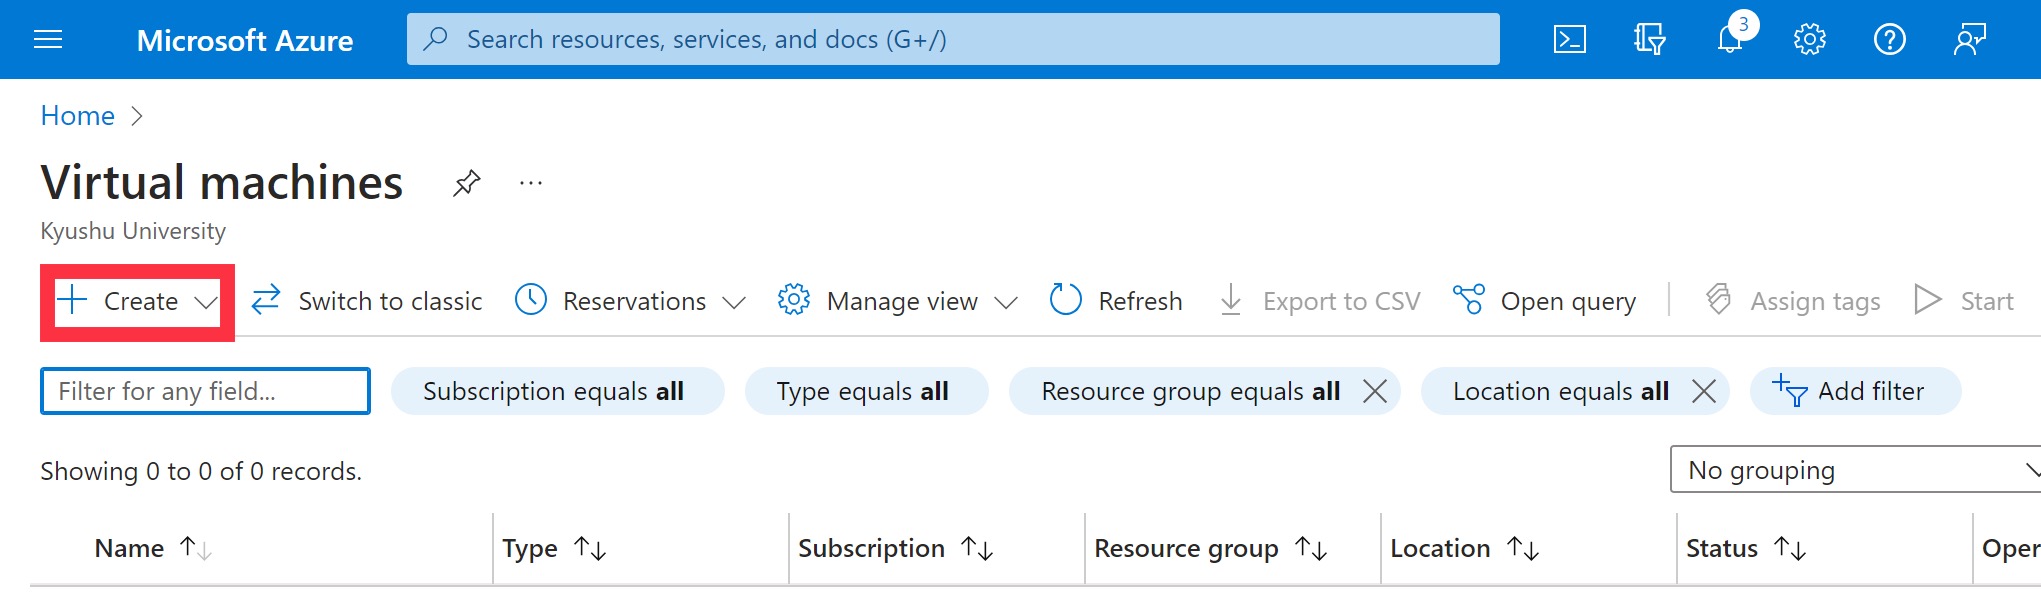 |
| (3) | Select an “Azure virtual machine”. |  |
| (4) | Create a new resource group. The name can be chosen arbitrarily. |  |
| (5) |
|
 |
| (6) | Set the user name and password. This is required when using virtual desktops, so do not forget it. |  |
| (7) | Check the License box. |  |
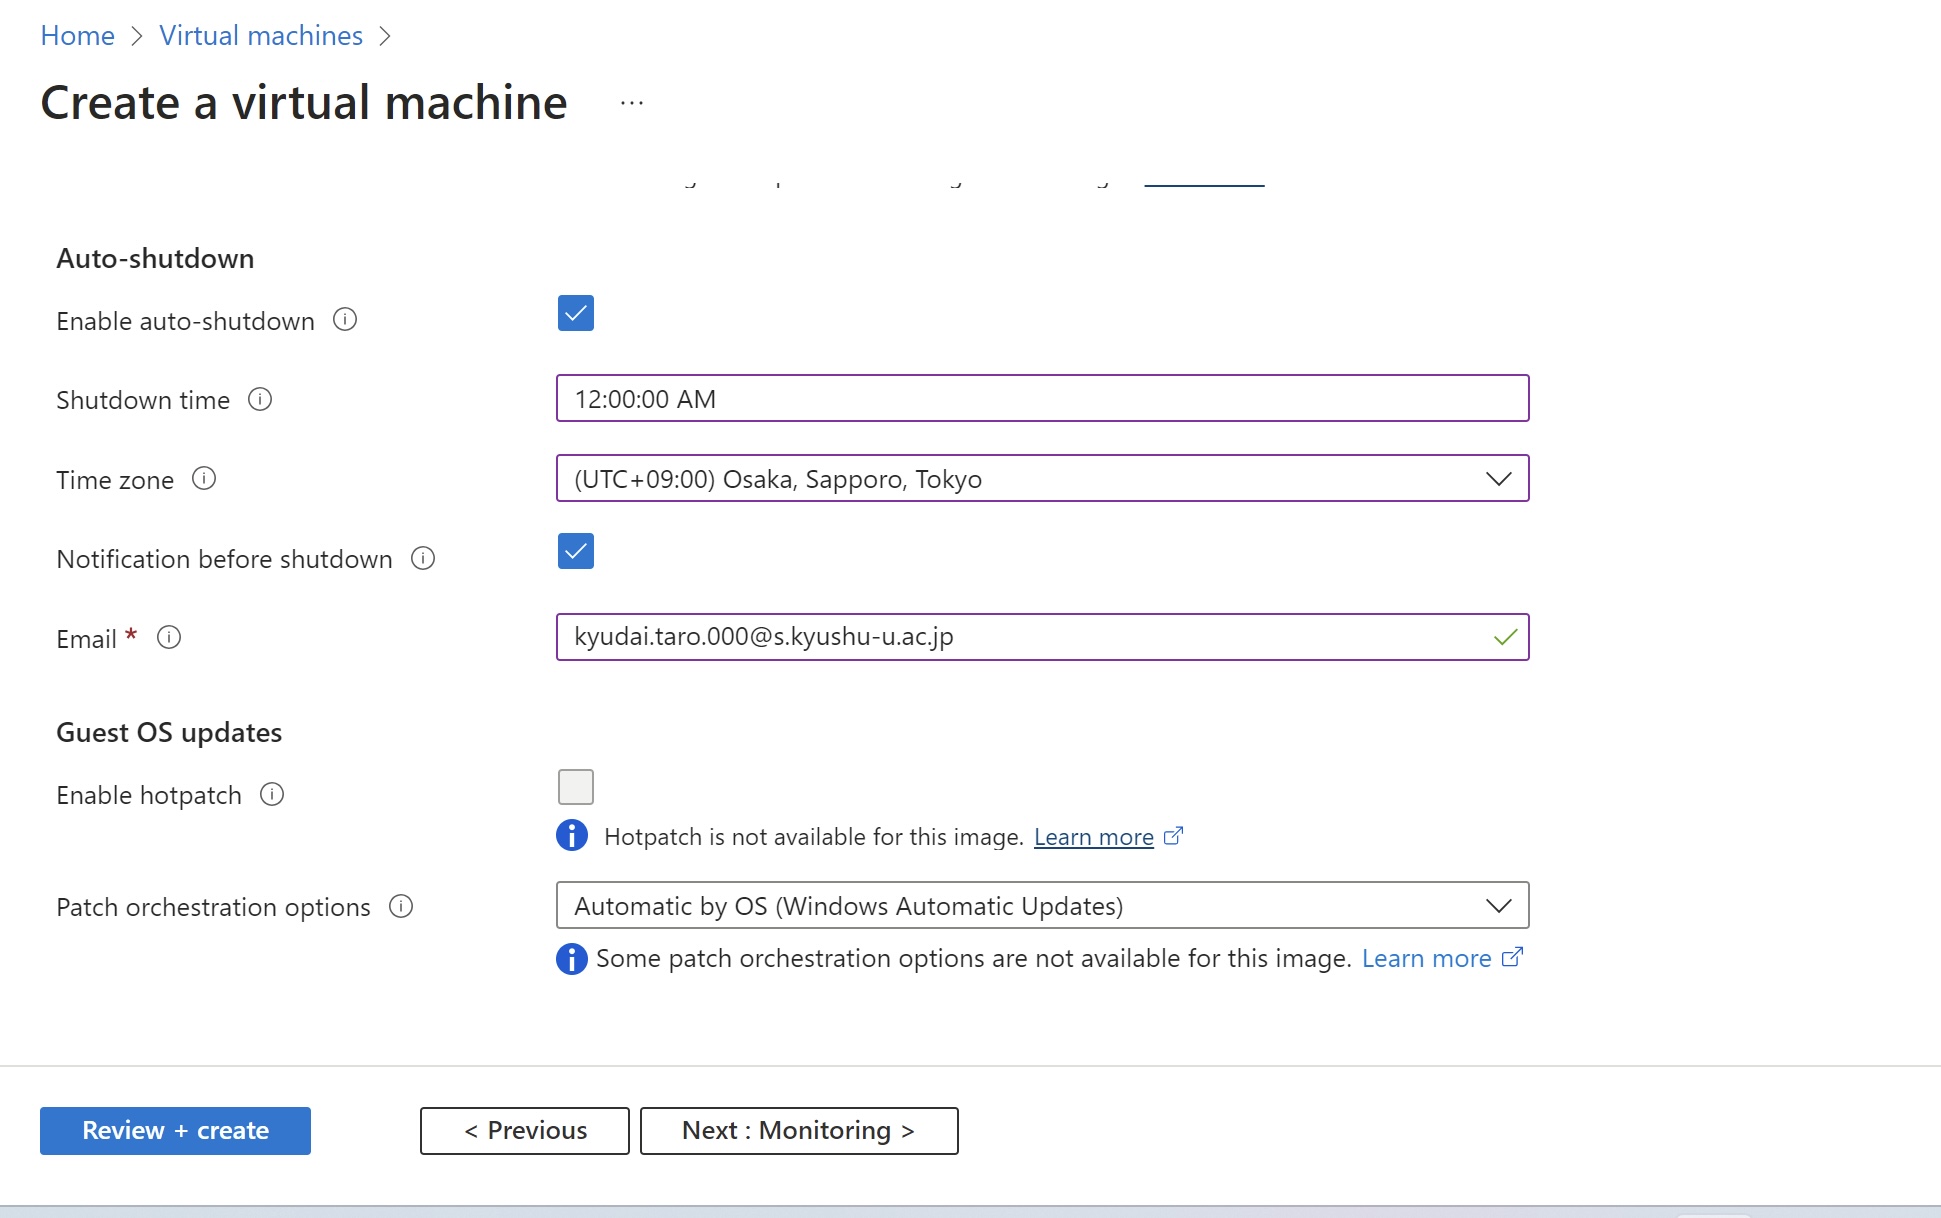
| (8) | It is recommended to set automatic shutdown from "Administration" to avoid wasting credits by forgetting to shut down virtual machines. |  |
 |
||
| (9) | Click on "Confirm and Create" at the bottom of the screen, then click on "Create" after the transition. |  |
| (10) | When deployment starts, you will see a screen like this, so wait for a while. |  |
| (11) | When deployment is complete, click on "Go to Resources". |  |
4. Viewing a virtual desktop
For macOS
- Enter the user name and password set when creating the virtual machine.
- Click on "Continue" to start the connection to the virtual desktop.
For Windows
| (1) | Install "Microsoft Remote Desktop" from the App Store. |  |
| (2) | From "Overview" of the virtual machine, click on "Connect". |  |
| (3) | Click on "Download RDP File.” |  |
| (4) | After the download is complete, open the file. |  |
| (5) |
|
 |
| (1) | From "Overview" of the virtual machine, click on "Connect". | |
| (2) | Click on "Download RDP File.” | |
| (3) | After the download is complete, open the file. |  |
| (4) | Click on "Connect” |  |
| (5) | Enter the user name and password set when creating the virtual machine. | 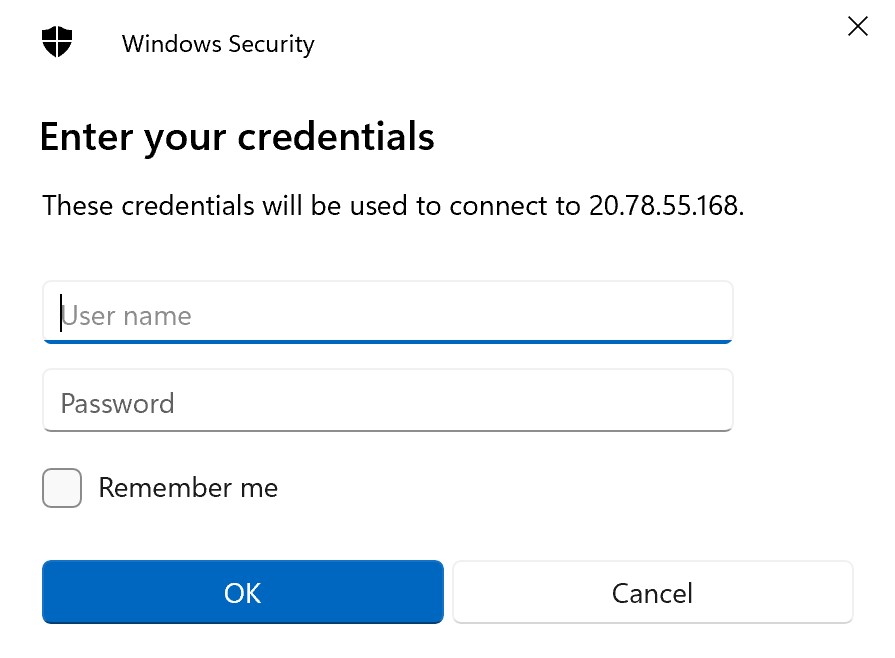 |
| (6) | Selecting "Yes" will take you to the virtual desktop screen. |  |
5. Stopping a virtual desktop
- Shutdown on the virtual desktop and click on "Stop" on the Azure administration page.
- Credits are consumed while the virtual machine is running, so be sure to stop it when it is not in use.
- Note that stopping a virtual machine will still consume credits. If you want to completely stop the consumption of credits, you need to delete the virtual machines with resource group.
| (1) |
|
 |
6. How to use next time
| (1) | Select a previously created virtual machine from "Virtual Machines". |  |
| (2) | Select "Start" to start the virtual machine. After that, it can be executed by opening the rdp file as when it was created. |  |
7. Deleting a virtual machine (resource group)
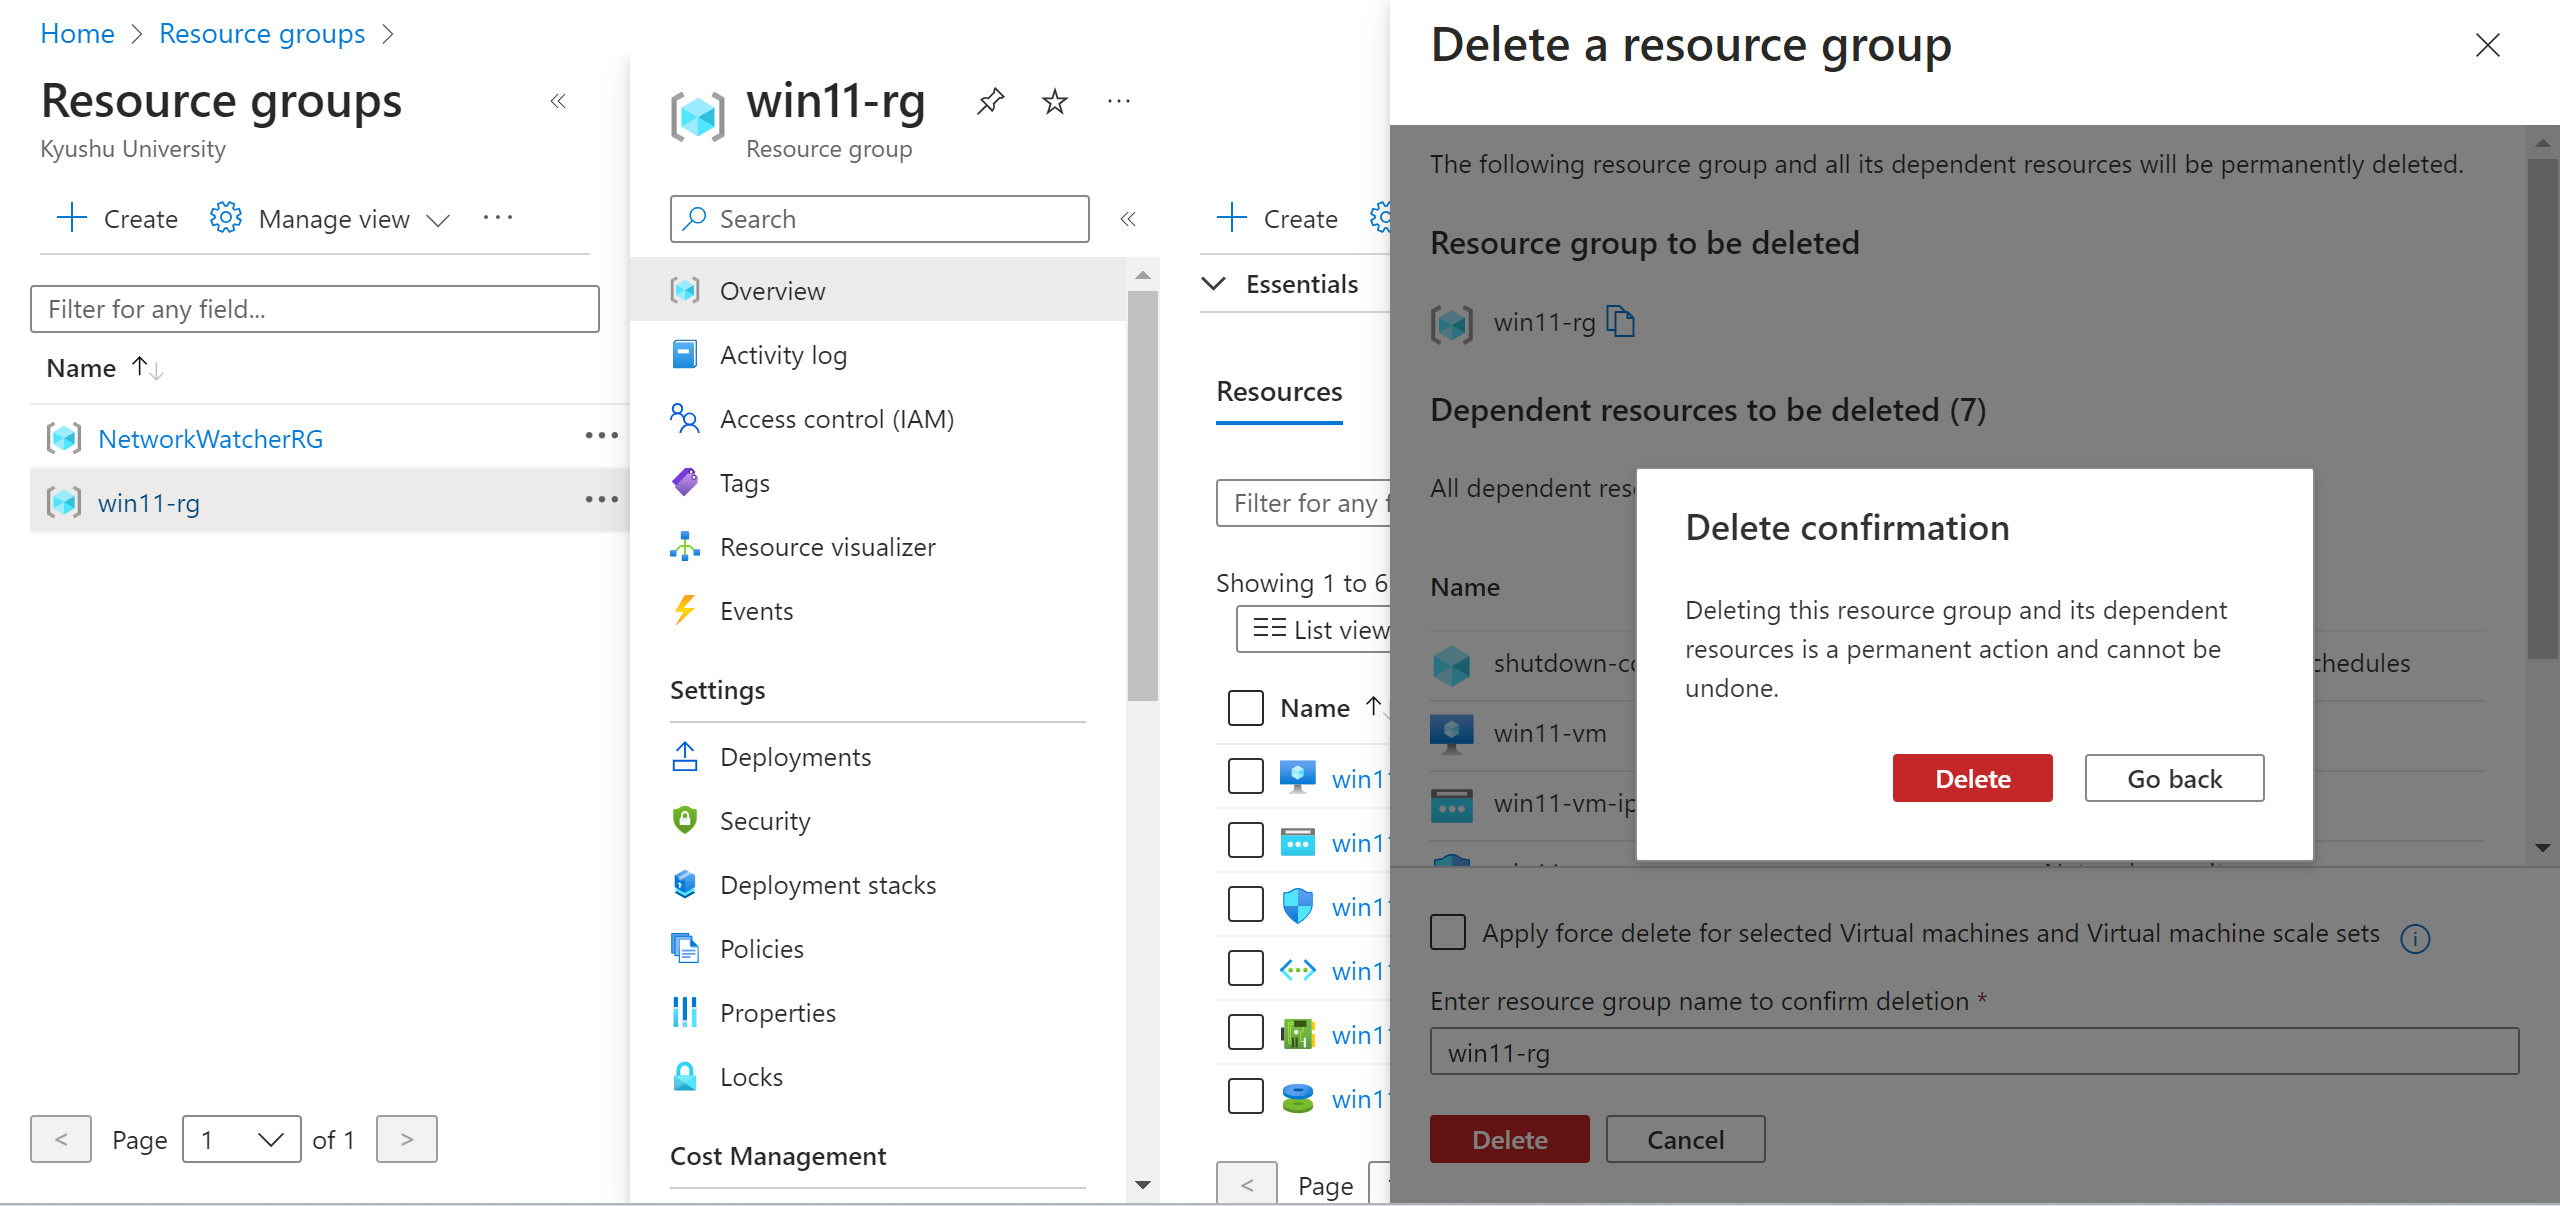
- Click "Delete" again when the confirmation screen appears.
- When the deletion is complete, the resource group will no longer appear in the resource group list. If you want to re-create the virtual machine, start over from 3. Creating a virtual machine.
| (1) | If you do not plan to use Virtual Windows because your lecture has ended, or if you want to recreate (initialize) Virtual Windows, search for "Resource Groups" in "Azure Portal" and click on it. |  |
| (2) | Click on the resource group used when creating the virtual machine. |  |
| (3) | Click on "Delete Resource Group" at the top of the screen. |  |
| (4) | Enter the name of the resource group for confirmation and click on "Delete". |  |
| (5) |
|
 |